Step 1: Prepare and Load Onboarding Data
The first step to getting NIM's onboarding module set up is to prepare your data for onboarding, and to insert it into NIM's onboarding system.
Before you begin, your data must meet the following requirements:
Each user must have a record within a source system, such as an HR or SIS database, and must have a unique identifier. This is typically an employee or student ID.
Each user must have contact information that is usable outside of your organization, such as a personal email address and/or a mobile phone number.
Each user's source information must be relatable to a user account within a system, such as Active Directory. For more information, see Inter-System Relations.
Configure the Onboarding Table
All onboarding records are stored in NIM's onboarding table. Directly after installation, this table is not yet enabled for use. Follow these steps to enable the onboarding table, configure it to store onboarding data, and relate its records to a target system.
Click the Internal System. Under the Configuration tab, select the
Onboardingtable.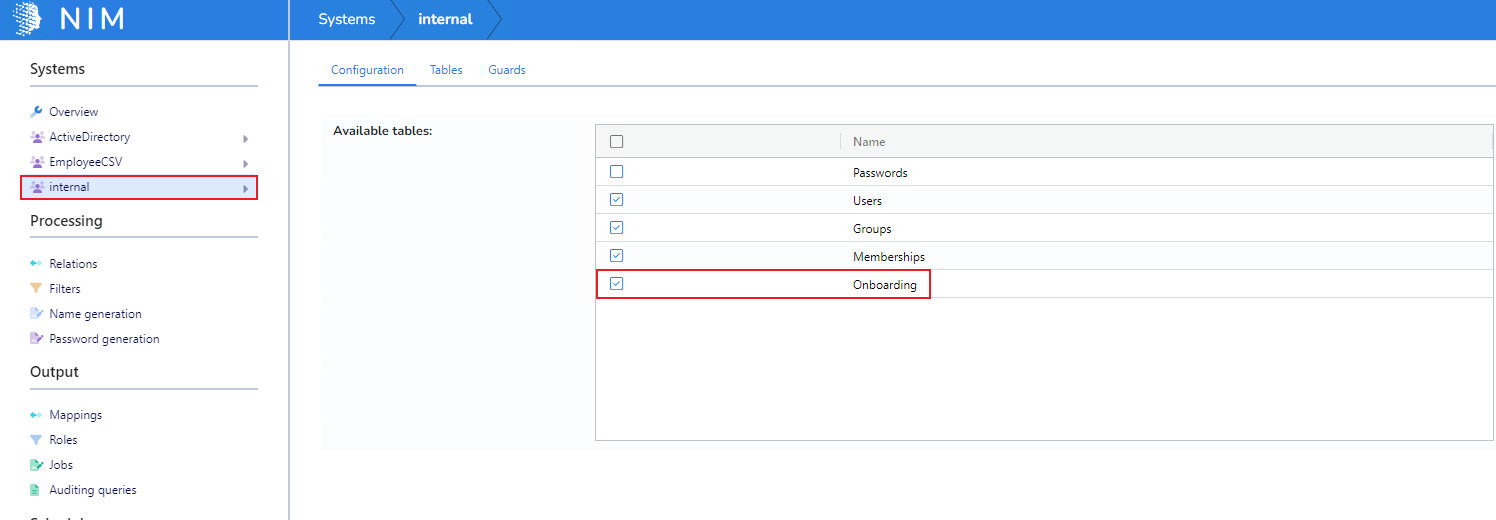
Expand the Internal system and select the
Onboardingtable. Go to the Columns tab.Ensure the ID column is marked as a
Key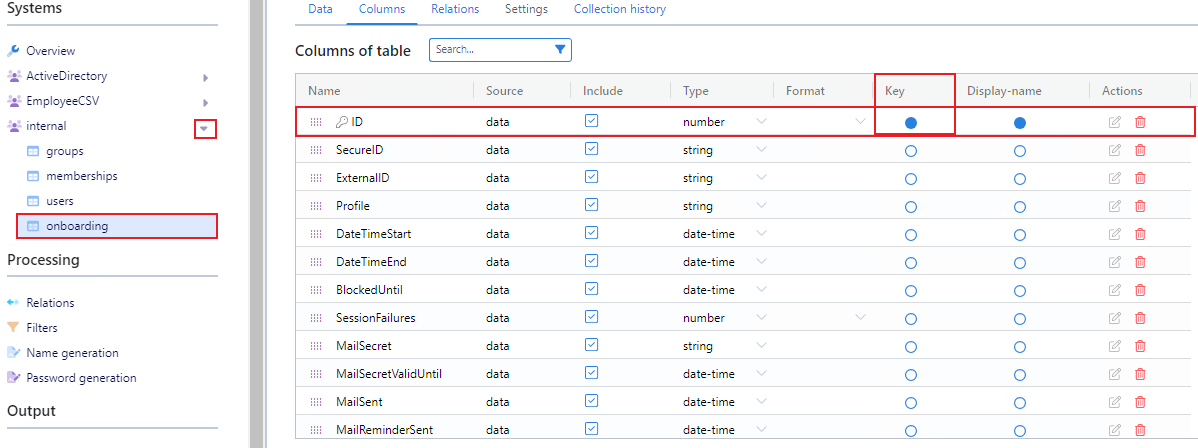
Next, a relationship must be created between the
ExternalIDcolumn of the Onboarding table and a target system table. In this case, AD > Users. See Inter-system relations for more information.
Create the Necessary Filters
You will need two filters to drive the onboarding process. One will insert user records into the Onboarding table, and the other will be used to look up an individual onboarding record.
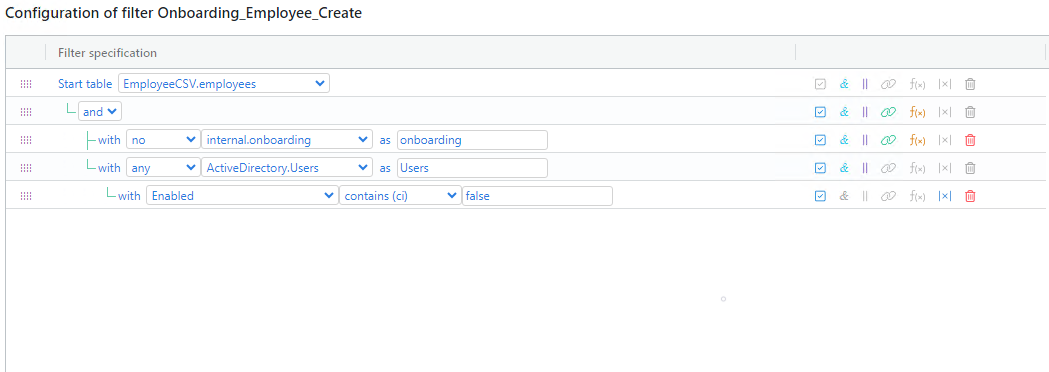
Create a new filter and name it Onboarding_Employee_Create. This filter should return active users who do not currently have an onboarding record.
Note
Include columns such as employee ID, personal phone number, and personal email. These will be used later in a Mappings to create the onboarding records. Phone number and emails are likely held within your personnel database. In the screenshot below, you can see we connect to our HRMS system. However, your filter may be very different from our example depending on the structure of your personnel database. Adjust accordingly.
Important
As pictured, this filter may create more records than you want. It is not ideal to create onboarding records for users who are already established within your organization. Ideally, this filter should only return users who were created in the last few days. Using this example, you could add an expression to only return users whose
whenCreateddate is within the last two days.Create two additional script columns within this filter:
calc_onboardExpiresandcalc_secureID.calc_onboardExpires - Generates a date object for the onboarding profile to use as an expiration date. Adjust the number of days you want the profile to be accessible by changing the “7” to the number of days needed. This will prevent an onboarding record from being accessible for all time, which would create a security risk.
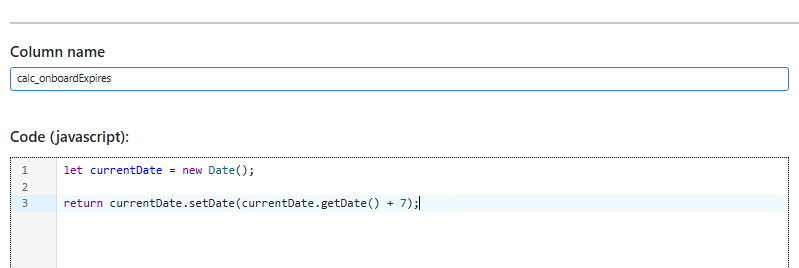
let currentDate = new Date();

return currentDate.setDate(currentDate.getDate() + 7);
calc_secureID - Generates the unique secure ID that will be used for each user's onboarding profile. This ID will be used as part of a link sent to the user so that they may quickly and easily access their onboarding record.
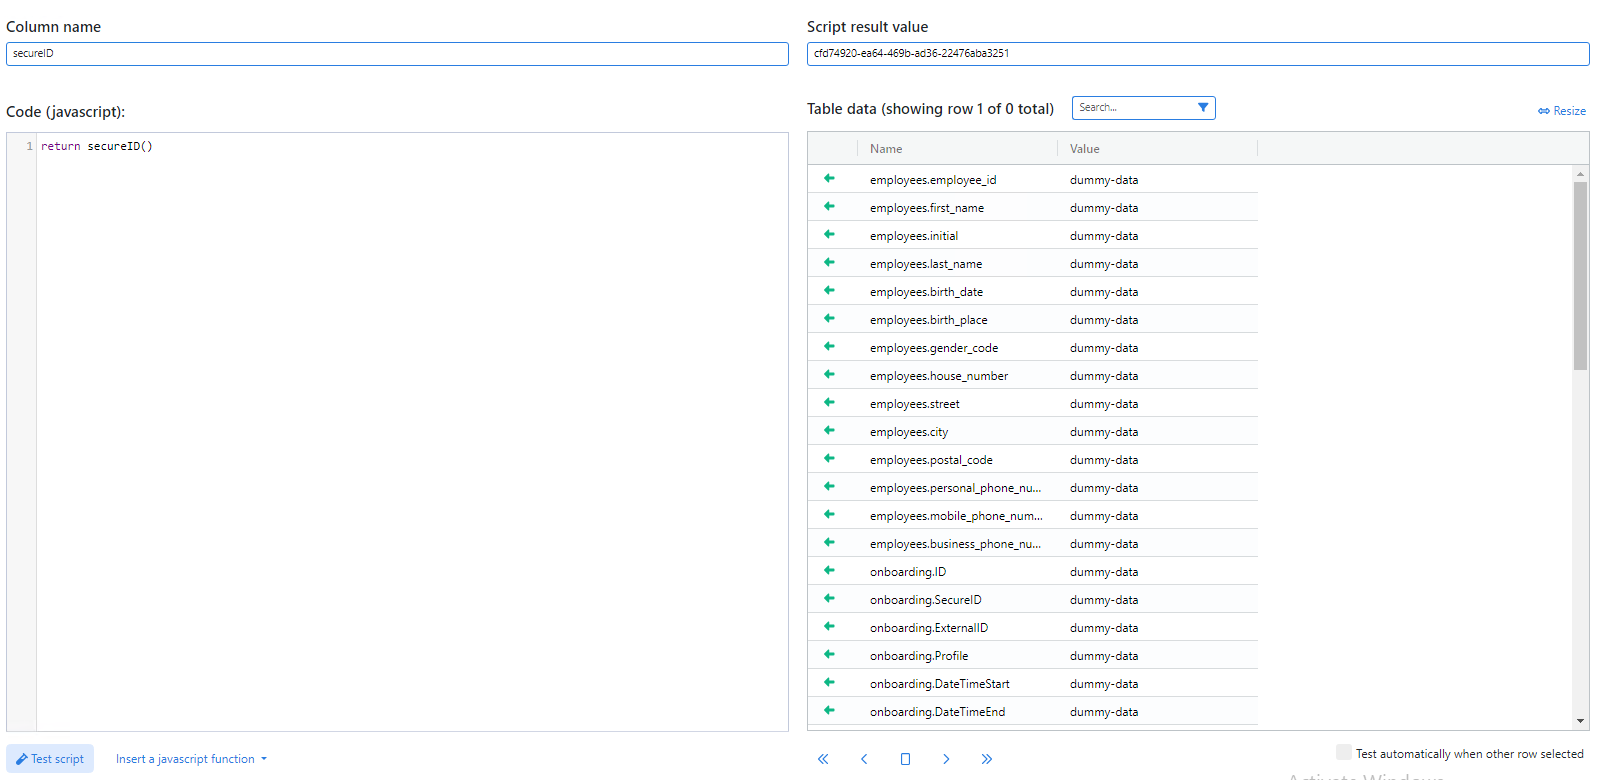
return secureID();
Optional: If you are going to send messages to the end user's mobile device via SMS, such as an OTP code to validate their identity, you will need to ensure that their mobile number is in the correct format. NIM's accepted format for mobile number's is
+<country code><phone number, no separators>.For example, the United States phone number of
555-867-5309should be returned to NIM as+15558675309.If your data includes mobile phone numbers, you can add a scripted column to the filter that transforms the number into the expected value. You can use the following snippet of code as an example. Be sure to replace
data['MyHRData']['CellPhone']with a reference to your own data.let phoneNumber = data['MyHRData']['CellPhone']; // Dummy data. Replace this with your mobile number field return '+1'+phoneNumber.replace(/[^0-9]/g, ""); // Removes everything but numbers from the phone number
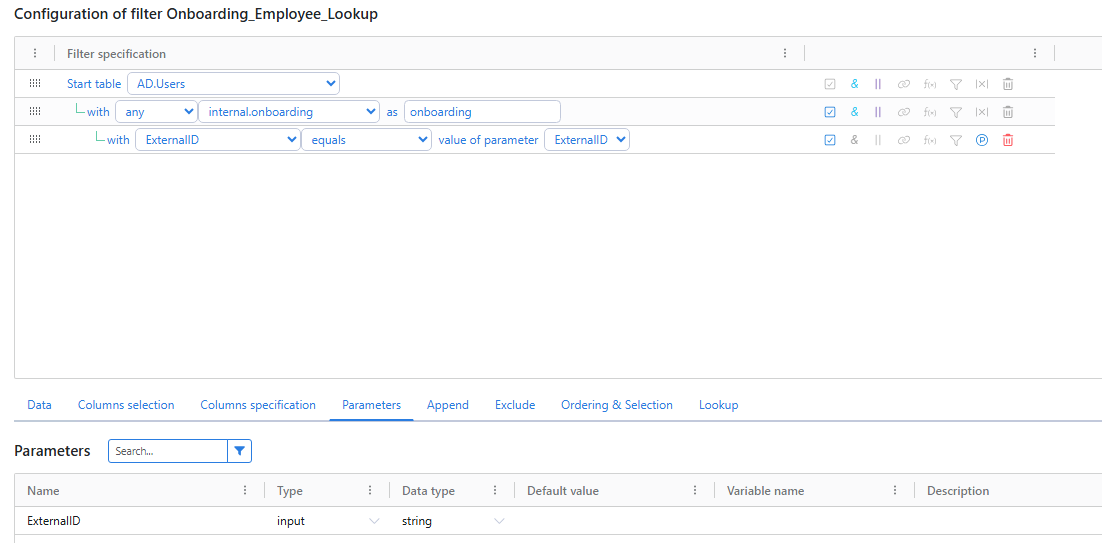
Create a new filter and name it Onboarding_Employee_Lookup. When a new user goes through the onboarding process, this filter is used to look up their onboarding record and provide its details to NIM. This will be a parameter-based, that will accept one parameter: ExternalID. This parameter is then used to filter on the
ExternalIDcolumn of the onboarding table.Important
This filter must also return the unique identifier of the user's target system account, such as the
objectGUIDfield for Active Directory. This will allow NIM to enable and reset the password of the target account later during the onboarding process.Note
This filter is referred to as your "Question-answer filter" from here on out.
Load Onboarding Records
The data from our Onboarding_Employee_Create filter now needs to be used to create onboarding records. This is done by feeding the results of the filter into a mapping, and running that mapping as part of a job.
Create a new mapping called Onboarding_Employee_Create.
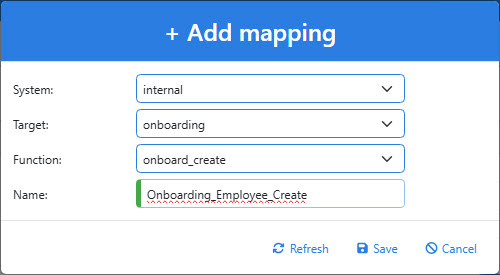
In the Filter dropdown, select the
Onboarding_Employee_Createfilter you created previously. Map all fields accordingly, using the screenshot below as an example. Some fields, such asProfile,MailAddressLabelandSMSPhoneNumberLabelshould be set manually to a constant value.Important
The
Profilefield value will need to match the name of an Onboarding Profile, which we will create in our next steps. In this example, we are calling it EmployeeOnboarding.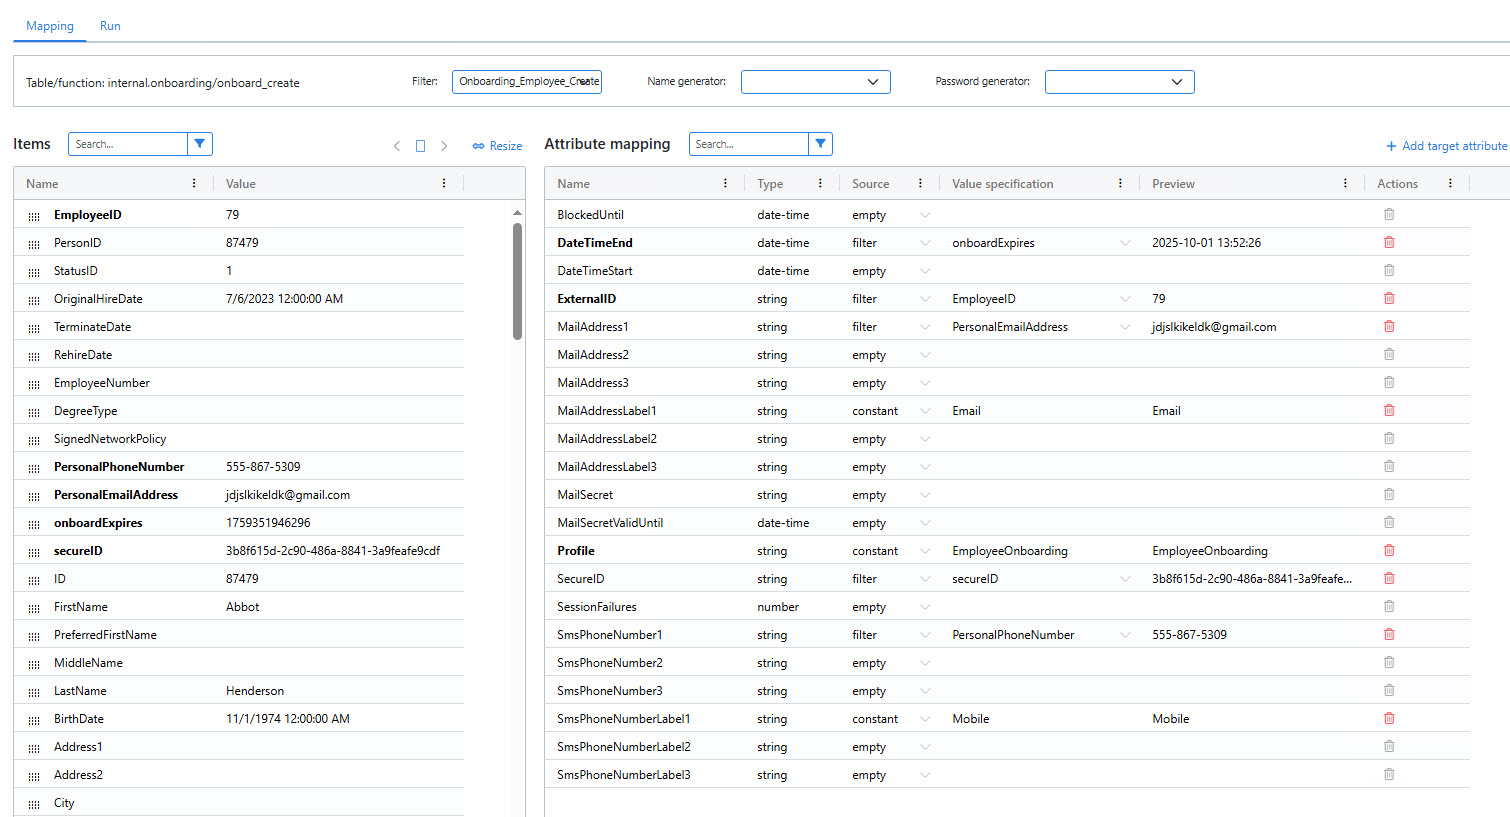
Click Save.
Create a new Job.
Under the Configuration tab of the job, add a new CRUD task and select the mapping you just created.
You may choose to evaluate and run the job at this time and create all of the onboarding records. You may also add the job to a task schedule and run it at a recurring time.
Once all of your onboarding records have been created, you can now create the onboarding profile.